I've been creating my boxes since 1998 and have made more than 400. I'm always looking for new ideas for box themes, and occasionally make lists of ideas in my art journals. I just spent some time browsing through old journals, gleaning ideas from those old lists, and now I'm ready to go to work. If you have any ideas for box themes, I'd love to hear them.
I also came across some other lists - miscellaneous lists I make while traveling - lists of humorous road signs... A few years ago when I accompanied my daughter to Houston, where she would live for a couple years, my list included the following:
*BEANPOT CAMPGROUND - "fart with friends" (somewhere in TN)
*Microsurgical Vasectomy Reversal
*UWITHME (this on a license plate)
*EN-G-NRD (on a license plate on I-81, "Virginia Technical Corridor")
*BUCKSNORT (town in TN)
*"BAY WASH" and "WASHING WELL" (2 different car washes in TN)
*"STANDING STONE" and "ROCK ISLAND" (adjacent state parks in...wait for it...TENNESSEE)
*"KEEP EAST TEXAS PURDY" (billboard in Marshall, TX)
*"GRAVES GUNS" (Texas...)
*"Mr. 98cents" (I guess less is more in Texas)
"ALL NATURAL COSMETIC SURGERY" ...TX
I wonder how the people from those states view the signs they see in the Northeast? What have you seen on the road lately that makes you chuckle?
Saturday, August 1, 2009


Thursday, July 23, 2009
Good Fortune - collage

"GOOD FORTUNE"
$275. (framed: 21 1/2" X 25 1/2") SOLD
This is the third in a series of collages with a Chinese theme. This will be framed with an antiqued gold bamboo frame - perfect for the subject matter. I know I need to work on the quality of the photographs for my art.
Monday, July 20, 2009
"SUNSET TAPESTRY"
SOLD 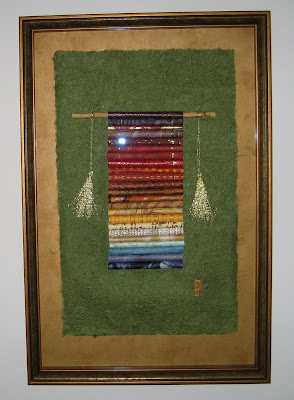
$475. (20" X 30")
Here's the final product, and I'm pleased with the way it turned out. Framing is quite expensive, however, because much of the work I do requires deep-walled frames, spacers to keep the glass away from the art, and museum-quality glass to prevent fading.

$475. (20" X 30")
Here's the final product, and I'm pleased with the way it turned out. Framing is quite expensive, however, because much of the work I do requires deep-walled frames, spacers to keep the glass away from the art, and museum-quality glass to prevent fading.
Friday, July 10, 2009
Sunset III


Photo #1: Tools
These are the tools I needed in order to evenly roll the papers. Starting with the bottom (dark blue), I rolled each sheet around the pencil to get a tight roll. The small silver ring has a diameter of about 1/2". I used this to adjust the diameter of each roll to the proper size, one by one. I needed to use the Glue Dots to secure the rolls until I would be able to wrap them with the gold thread. I slid the small paint brush handle inside each roll to press the roll against the Glue Dot. This was the only way I could firmly press the rolled up paper against the glue without crushing the roll.
Photo #2: Wrapping
I threaded a needle with the gold thread, tied a large knot, and brought the thread up from the underside of the paper. As added insurance, I stuck a Glue Dot over the knot. Beginning with the top (deep purple) roll, I wrapped each paper, working my way down the row. At the bottom, I brought the thread to the back of the paper and pulled it across to the other side of the rolls before working my way back up. Once again, I pulled the thread to the back side, tied a knot, and secured it with a Glue Dot.
Photo #3: Embellishments
As I was completing the wrapping process, I considered what else my collage might need. The papers would make a great statement on their own, but the piece still needed "dressing." This is one of my favorite steps - finding the perfect embellishments in my vast stash of flea market treasures. I made a quick glance around my workspace and spotted the split bamboo piece. Of course! The paper rolls could not just float on the green sheet, so the bamboo would provide a sort of hanger. Once the hanger was in place, I added a bit more gold to the mix with handmade tassles. A polymer tile I'd previously made of my chop* completed the composition.
*This chop is my name written in Chinese.
I'll post the framed project later.
Thursday, July 9, 2009
Sunset Collage - Stage II


I've finally managed to figure out how to attach the different rolls of paper to the substrate. This was much more difficult than I'd imagined. It's not a matter of simply gluing or stitching rolled up papers to a background. There was a lot of measuring and marking involved. Any pencil markings must be done on the back side of the substrate because it is not possible to successfully erase marks from this paper.
###
I chose a grass green paper as my base. You will notice that the back side of the substrate is a different color than the front. That is because this paper is actually 2 sheets of differently colored paper bonded together. It results in a substrate sufficiently strong enough to resist tearing during stitching. I have also utilized this "reversible" feature as a design element in my paper quilts, which can be viewed in previous posts.
###
Then, I needed to hand-baste guide lines onto the substrate so I would be able to see, on the front side, where I'd need to attach each roll to allow the rolls to butt up to each other evenly. I executed the basting using thin, black thread and a very fine needle.*
I have now completed sewing the rolls a distance of 1/2" apart from each other, using about a 2" line of stitching. My intent is to allow room near the sides of each roll where I will add a line of gold thread to make it appear as though the rolls are roped together. I haven't yet decided how I will attach the gold "roping". I'll have to play around with a prototype that I've been using all along to work out the kinks ahead of time. *When sewing on paper, one must be mindful that each stitch, even if removed, will leave a small hole in the paper which could be visible on the finished piece.
I'll keep you posted on my progress. If you have ever done something like this and have any hints for me, I'd love to hear from you.
Wednesday, July 1, 2009
Sunset Collage in Progress

I've got SO many pieces of leftover decorative papers. I consider "leftover" anything from 1" to maybe 6" in varying widths. Larger pieces I can still use for small boxes. One of my favorite things to make with leftovers is Paper Quilts. And then - sometimes I just like to fiddle with all the different textures and colors to come up with some type of collage.
I just spent about 2 hours selecting papers, cutting them to the same size, rolling them up, and placing them in a way that I believe will look like a sunset. Here's what I've got so far. I'll keep you posted on further developments as I figure out my substrate and any other elements I might include.
Tuesday, June 30, 2009
SOLD ART
Some photos of recently sold art. Pictures of art here. Picture in your head of me doing the happy dance! The first photo is of a collage titled "India", and the second photo is a paper quilt titled "Fresh Cut."


Subscribe to:
Posts (Atom)
